Friday, November 29, 2013

Make Your Own Crossbreed Holster

Since this is an IWB holster (inside the waist band), I needed to ensure that I had a proper fit. It took me a total of three hours to finish this holster, and compared to the $70-$100 price tag plus shipping for a pre-made Crossbreed, I am winning hands down.


I ordered all the hardware from Tandy Leather Supply, and it arrived on the second day with ground shipping. My Kydex work could be better, but it sits great, and the small play it has due to the form not being perfect is tightened to perfection by my belt. Who knew?


The fit is excellent, and I am very happy. It makes a very low print, and sits comfortably, even while sitting. Of course, the Makarov is a fantastic little gun...

Monday, November 18, 2013

CMR Sheath

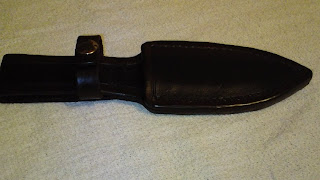
I received the custom Mini Skinner blade from +Chuck Richards-Handmade Knives and knew I had to make a sheath for it right away.


The knife is 5 3/4" oal with a 2 1/4" bellied cutting edge. It weighs 3.2 oz. and fits my hand nicely. The steel is Bohler D2 and the handle material is black G10 with solid brass pins. The steel has been cryo treated with a final HRC of 59-61.


I did a bit of tool work, and my stamping isn't the greatest, but I think it came out decent enough. I especially like the button closure, it really suits the knife. I wanted a closed sheath since it's such a small blade, even though the sheath is friction fit and wet molded. I didn't expect to have taken a full 7 hours to make this sheath, but it was worth it.


I decided to make the design handy, streamlined and simple. The belt attachment loop is sewn on (top and bottom), and used the integral portion of the leather for the flap closure, keeping the smooth, finished leather exposed to show off the tooling. The dye is mostly brown, but I also highlighted the edges with black to give it some depth.


I went with a 9 oz. veg tanned leather, which is a bit on the heavy side, but I utilized most of the thinner portion of the shoulder, so it could possibly be around 8 oz. --As always I use Fiebing's leather dye, acrylic resoline, tan kote, and mink oil.


Full video on my YouTube Channel. Thanks to Chuck for a wonderful blade!

Friday, April 19, 2013

 The Mora Clipper Project


I started out with an idea to make a leather sheath for my Mora Clipper, but I wanted to play it safe. This style of Mora is also known as the Companion. I decided to first make a simple sheath and see how it went, followed by a more advanced sheath to test my abilities.
This is the Mora standard sheath I finally ended up with. The brown dye didn't take as well as I had hoped, mostly due to my impatience to allow the leather to fully dry before dyeing and buffing with resoline. The stitching is good, the burnishing could be a bit better, and I don't really like the overall shape. I also didn't like a standard belt loop since I was used to "clipping" the Mora to my webbing. This got me thinking...


I couldn't believe how easy it was to cut this off the original sheath and clean it up, add some paint, then affix it to the leather. I used a Chicago screw up at the top and two rivets at the bottom of the belt clip. The Firesteel loop was fun to make, and I started with a 'T' shaped piece of leather, then skyved it to fit the weld. This was turning out beautiful.


The sheath was treated with resoline on the inside with two coats, and I applied mink oil to the exterior for the finish. Notice how the design was improved over the standard brown with an extension at the top which covers more of the handle. The Firesteel fits securely, and it doesn't wobble. I can pull the Firesteel out and place it back easily, too. I even made a tiny drain hole at the bottom of the sheath just for kicks.

And, here are the two sheaths together for comparison. I definitely like the black Mora sheath better. This is a very nice, solid design --especially for a beginner like myself. Check out my Youtube channel for more details.


Tuesday, April 16, 2013

The Cold Steel Sheath Project: Making A Custom Leather Sheath for an Axe.


This was a fun project. It all began with a blade, an axe in this case, and a need for a sheath. I had originally modified the Cold Steel Trail Boss by making the axe paint-free, giving it a natural look.


I also wanted to wrap the haft up near the axe so I can make a comfortable grip when I use it for close-up work. This wrap also protects the haft in case I miss my mark on a full swing.


I started the sheath with some vegetable tanned leather, and traced my pattern onto it. Next, I checked the fit to ensure the design would secure the axe. After final sizing and trimming, I added a coat of Tan Kote to the underside of the leather, and dried it, then wet the leather and beveled the edges. I cut the weld and afixed it with some contact cement. I dyed the leather and dried it again, then set off to drill and punch holes for rivets and stitching.


I wanted the sheath to look clean but also match the leather lacing I used on the haft. I punched holes for lacing in the sheath, you can see it on the bottom edge. After a good application of Fiebing's Mink Oil, the leather looks superb. This sheath really came out nice. Check out the video I will post below for more details.


I walk you through most of the process in the video, showing you the stages taken to make this sheath for the Cold Steel Trail Boss axe.

Thursday, March 28, 2013

Irish Ties Make Good Allies


I was asked to make a sheath by a friend in Ireland, but he couldn't send the knife to me for sizing. I knew I could be in trouble, and truth be told...I didn't need trouble. I am new to leathercraft, at least as far as final, polished products are concerned. I have long used leather in projects, and being an ex-carpenter who is *somewhat* proficient with his hands, decided to take on this challenge, too. I mean, it's one thing to make a few sheaths for personal use, another entirely to make one for somebody else. If I mess up, no big deal. But, I couldn't possibly enjoy making a sheath for a friend and not have it work.

Surprisingly enough, I made it work. I trusted in the drawing he sent me, and I got to it. Within the first three hours I nearly had it completed. I actually enjoyed making this sheath more than making them for myself! I sent it off to Ireland after a nice treatment of mink oil was applied. I love this sheath design. It has black and brown dye, a nice edging all around, fine hardware and hand sewn to perfection. His custom bushcraft knife looks great in this sheath.

The trick now, was to wait for Ireland to respond...and so I waited...and waited...and waited...

No. It wasn't too long of a wait. Deccied sure had some fun toying with me like that, though. ;)


Sheath for a Classic Mora

 This sheath is for my classic Mora, which is by far my favorite carving knife. I love the Scandinavian grind and razor sharp edge. I started with 9 oz. vegetable tanned leather and laid out a basic template. I knew I wanted a ranger carry option, but also decided to leave a simple belt option, so I notched that at the top.
 Using Chicago screws on the straps will keep it modular and easy to maintain. Some blue Locktite will assist in keeping them from opening any time soon. I went to wet forming, and the blade was easy to manage in the leather. After cutting the weld, gluing and dyeing, I hand stitched it with the usual wax coated thread.
  
A closer look at the sheath with knife will illustrate some effects from careful burnishing. I use a simple burnishing tool, wet the leather lightly where I intend to do the work, and start rubbing without too much pressure.

The final sheath is very nice with a friction fit.I actually made an additional, wide strap which goes behind the sheath and snaps into place at the top to allow me to carry the knife in traditional manner, but with the added benefit of having very wide room for my military belts. It can be easily popped off by un-snapping it.

Leather Sheath for a Llewellyn Blade

  
This is the first "official" sheath I made. I used a sexy 9 oz. vegetable tanned piece of leather, died it with Fiebing's professional black oil dye and it is hand sewn.

I wanted to keep it simple, so I used a pattern that would incorporate the firesteel. The one pictured is temporary; I have a larger firesteel I will use which will fit it beautifully. Take a look at those rivets, oh my that's pretty...

You can tell the logo I stamped is generic, but it's a skull, so I am pleased. One day I can order a custom stamp, maybe. The knife is a custom blade made by an acquaintance from the Survival Monkey, named Valkman (Don Llewellyn). He lives out in Las Vegas, but doesn't make blades any more. I also own one of his fighter blades made out of CPM 154 steel. I paracord wrapped this one, though.

See more here at my YouTube Channel: